Saturday, July 10, 2010

DotNetNuke: Free Module - Sample SiteMap with Navigation and Filter

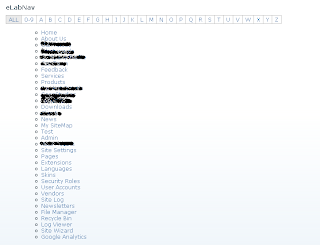
Check out this free dnn module showing site map with option to filter the links using alphabet. Here are some of it's features:
  • Ajax to load tab links for an alphabet
  • Option to see all tab links or specific tab link
  • Only initial version to present the idea
  • It uses jQuery Navigation Pluggin  to show filter links
  • Screenshot:

Further improvements and objectives

The basic idea to would be to create a module that can be used as a dynamic page that shows various links and can be used for SEO purpose.

Send your suggessions

Please send in your wish list of features that you expect and can add value to this. Please feel free to download and evaluate the module and use it in whatever way you want.

Download

DotNetNuke: Common tips for skin Developers

    Skin Development

  1. How to add reference to jQuery?
    Add following server tag at the top of your skin file
    Add following at the end of your skin file:

    <%  DotNetNuke.Framework.jQuery.RequestRegistration()%> 
    
    <script runat="server">
     Protected Sub Page_Init(ByVal sender As Object, ByVal e As EventArgs) Handles Me.Init
      dotnetnuke.Framework.jQuery.RequestRegistration()
     End Sub
    </script>
    
    
    Thanks to Brian Dukes for correcting this
  2. How to access Tab Name?

    <%=  PortalSettings.ActiveTab.TabName%> 
    
    Now that you know how PortalSettigns is having ActiveTab you can play with properties of ActiveTab which is of type TabInfo
  3. How to access currently logged in user?

    <%=  PortalSettings.UserInfo.DisplayName%> 
    
    Once again PortalSettigns, you can use PortalSettings.UserInfo.Roles to provide role based elements to your skin.
  4. how to get path of Skin folder?
    Most useful and easy one

    <%=  SkinPath%> 
    
    so if you want to show an tips.jpg which is images directory in your skin root directory, do this

    <img src="<%=SkinPath %>images/tips.jpg" alt="tips" title="tips" />
    
  5. How to find default portal and admin skins from database?

    selecT* from PortalSettings where SettingName in ('DefaultAdminContainer','DefaultAdminSkin','DefaultPortalContainer','DefaultPortalSkin')
    select * from HostSettings where SettingName in ('DefaultAdminContainer','DefaultAdminSkin','DefaultPortalContainer','DefaultPortalSkin')
    
    DNN will try to look at PortalSettings table and see if admin and default portal skins are available there, if found, it will apply that settings otherwise it will load it from HostSettings table.
    Here is more advanced link from dnn blog.

    Reference and links for skin development

  1. There are lots of skin objects, which are described well here, or you can download entire DotNetNuke Skinning Guide from dotnetnuke website.
  2. Building dnn skins using BluePrint css framework
    Free Sample skin developed using BluePrint css framework
  3. Tutorial on building DNN Skins using YAML
  4. Pros and cons of using css frameworks in dnn

More..

Please drop me a line to get any kind help regarding the dnn skin development and administration problems.

Thursday, April 1, 2010

DotNetNuke - What is Module Definition?

DNN - What is Module Definition?
What is Module Definition?


A Module must have at least one definition in order to show the default view control in module. More over, Module is collection of module definitions, that contains group of controls (View, Edit, Settings). When a module is installed to the tab, all the definitions are installed to it and default or view controls from all the definition is visible to the tab.

But why do I need it?

When you want to display your module views in different panes!

I don't get you!

Well what will you do if you have a two column layout (skin) and you are asked to show recent posts in the side bar pane and recent comments at the bottom of content pane?

I will create two different modules!

No, that's not a right way to do it! Module definitions are just to do this kind of things. Creating two different module and then creating a module package for both of them and installing them individually is not an efficient way. Logically, your recent posts' view and recent comments are part of your blog module and by installing blog module you will be able to install both of them in any pane of skin you want.

Ok, But I can just add the recent comments at the bottom of my posts in the ascx control, why do I create a separate view for it?


Well, what if client ask you to move it to sidebar? separating the things will allow client to do it him self!


Oh I see! So, I have to create two view controls in the module and just create two separate definitions for both of them.

Right. That's the correct way to do it.

Ok, and what If I want to add "New Post" link to both of the module definitions?

Well, you can create a single edit type of control and you have to add the control's link to both of the view controls and add the edit control to both definitions. But note that if you are using module id this will not work. Module ID for both of them will be different.

[But most of the time, you will not do that in DNN, you will place edit link to the view that is most relevant.]

And what about settings, can I share settings of module between them?

Nop, you cannot share it. installing every definition will create a new module id. and settings are stored by module id so technically, you don't have facility to do this by design. That makes sense, For example, if you want to show unapproved comment's list to the blog owner, and change the setting for that definition, that will not affect the blog list and recent post list.

Conclusion:
You can think module definition as a deploy time helpers, if you want that certain group of view controls should be installed with the installation of module but don't want them to stick to the panes they are installed in, just split your views in more than one view and add as many definitions as you want to allow flexibility.

Thursday, March 4, 2010

Building Skinnable Modules

Introduction
In this post we will try to create a basic module development strategy when you want to create a module with multiple skins. The basic idea here is to create an initial demo that can be re-used to create modules with multiple skins.

Let's Start:
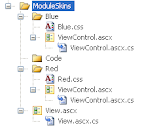
Let's start by creating some set of controls and css just like you see in the image below.

Skinnable Module Image 1

  • Create a Module from the control in the root directory (View.ascx)
  • View.ascx is just a control loader which will decide which skin control to be rendered based on skin that is selected, if no skin is selected, you can assign default skin.
Further Improvements:
  • If module control is relatively simply and contains only listing view like repeater or data list, you can move the cs file of any one control to code folder, and change code behind file attribute for both skin controls. That way you don't have to maintain separate code file for each skin.


Source Code:

You can download source code from here.

Saturday, January 23, 2010

DotNetNuke - Alternative for using getTabByName or getTab - Part 2

If you have gone through this post you will find that there are alternatives like storing the TabIds in session state, or cache, or creating entries in siteUrl.config. In this post we will see some more options regarding the same problem and advantages and disadvantages of all of them.

Let's look at other two options that are available:

(1) Accessing Tabs without tabId is another option that you can choose. Good thing is you don't have to worry about tabId and bad thing with this is it will not work with querystring params.

(2) Store the tab ids you require by providing a module setting. If you choose this option, you have to create a settings page which provides a drop down for each tab that you are using link of navigation, and you can then simply use the tab id stored in settings everytime. Good thing is that all other information along with the tab id is not loaded from the database.

Now Let's look at the detail of each method:
(1) Session State:

Good When: If you are using the tabId in the session that is strongly depend to the current session (for example link to user's profile) it's good to store the tabId in the session. But that doesn't mean I'm in favour of adding entire TabInfo object in to the session, If you want to use TabId only, you can directly add TabId into the session. If you are using more than one tab you can maintain hash table. Use some utility class for boxing and unboxing the HasTable from the session.

Not Good when: If your module needs a tab that is providing navigation to other related tabs of the site, that are static (for example a help page for the module of features) you should not use session, as it will aquire large set of memory for the sites that are heavy loeaded with users.
Multi-Portal Considerations: Works fine if module is used in multi-portal or not.

(2) Cache:

Good When: storing the link of tab that is not dependent on session. 'Not Good When' for sessuib state is resolved with the cache. If you are new to dnn data cache, please go through the help articles before doing anything.

Not Good When: I don't see any disadvantages of using cache if used properly. Common problems with using caches are, refreshing and populating the cache at correct time, If you are good enough to understand that, there are no problems with this. I will recommend to google this for getting in-depth understanding of this topic.

Multi-Portal Considerations: Works fine if module is used in multi-portal or not, but it's good practice to add portalId at the end of the key if you are planning to use the module in multi-portal environment.

(3) SiteUrl.Config:

Good When: you have small number of static tabs to redirect. You can just create an entry and use it from any where in any modules. I've used this trick many times to show user's shopping cart from anywhere in the site by redirecting them to shoppingCart.aspx. You can use it for the same purpose.

Not Good When: NA

Multi-Portal Considerations: If you are dealing with multiple portals having same tab name, Either you have to create site url entries with different names or you cannot do it. For example, if you are using this feature for help, you cannot give all the tab's name as help.aspx, but you can do it help1.aspx, help2.aspx which is possible. or It may be possible, But I am not able to find the correct solution for this. But atleast consider this when you are in multi-portal module development.

(4) Tab Names:

Good When: You are sure that you will never change the tab name

Not Good When: You are using Query string

Multi-portal Considerations: No worries, works fine without any problems.

(5) Module Settings:

Good When: You are not sure what would be the tab name when you deploy the page (because only client can name it correcly ;) ) so, it's wise decision to provide ui with Drop downs to store the it as a module setting once and forget for the rest of the life time after that.

Not Good When: you have a module that is accessing database agressively, this will add additional data access load to the database server. Bad thing with this is you cannot control number of round trips to the database for a specific instance of the

Multi-portal Considerations: It's not possible to deploy local setting with dnn portal templates using export featrues.

I hope this is useful to you when you develop modules.
Friday, January 22, 2010

Year 2009 overview for the blog

  • Two articles from the blog are selected in DotNetNuke.com newlatter (DotNetNuke is one of the best CMS in .net and won best cms awards more than once) http://www.dotnetnuke.com/Portals/25/Newsletter/DotNetNukeNewsletterVol.VNumber10.pdf (See tips and tricks section)http://www.dotnetnuke.com/Portals/25/Newsletter/DotNetNukeNewsletterVol.VNumber7.pdf (See tips and tricks section)
  • For year 2009 records for the blog says - 19240 visitors, 27422 page views with 16994 unique visitors and most of them are from out of india.
  • some of the posts like creating modal popup in html4 is accessed around 3000 times in the last year
  • Hosting open source dotnetnuke skin project at codeplex (osdnnskins.codeplex.com) and post updates about it at this blog. Many of the sites like http://www.arthawena.com/ already using it having a back link to the blog.
  • Some of the unique researches like 'Flash remoting with asp.net' is all time fev of all the flash and no-flash devs.

Thanks everybody for the support and help, keep in touch

Thursday, November 12, 2009

jQuery How to build a simple table style switcher


  1. Get Started
    Let's create an html table that is showing some sample data. Here is it:

    <table>
    <tbody>
    <tr>
    <th>
    Column1
    </th>
    <th>
    Column2
    </th>
    </tr>
    <tr>
    <td>Data1.1</td>
    <td>Data2.1</td>
    </tr>
    <tr>
    <td>Data1.2</td>
    <td>Data2.2</td>
    </tr>
    </tbody>
    </table>


  2. Let's Add some style to it
    Let's add some simple styling to the table so it looks pretty! here is the css:

    table{width:400px;border:solid 1px black;}
    th {background:black;color:White;}
    td {color:Black;}


  3. Thinking about multiple styles of table
    Let's add an id to table and change some things in our css to make it more
    specific.
    HTML:

    <table id="my-table" class="my-table">
    <tbody>
    <tr>
    <th>
    Column1
    </th>
    <th>
    Column2
    </th>
    </tr>
    <tr>
    <td>Data1.1</td>
    <td>Data2.1</td>
    </tr>
    <tr>
    <td>Data1.2</td>
    <td>Data2.2</td>
    </tr>
    </tbody>
    </table>


    CSS:

    #my-table{width:400px;border:solid 1px black;}
    #my-table th {background:black;color:White;}
    #my-table td {color:Black;}


  4. Let's build another style
    Let's add another style to table. So now css looks like following:

    #my-table{width:400px;border:solid 1px black;}
    #my-table th {background:black;color:White;}
    #my-table td {color:Black;}

    #my-table-gray{width:400px;border:solid 1px gray;}
    #my-table-gray th {background:gray;color:White;}
    #my-table-gray td {color:gray;}


  5. Let's add jQuery to switch style!

    <script src="http://code.jquery.com/jquery-latest.js" type="text/javascript"></script>
    <script>
    jQuery(document).ready(
    function() {
    jQuery("a").click(function() {

    var table = jQuery("#my-table")[0];
    if (table.className == "my-table")
    table.className = "my-table-gray";
    else
    table.className = "my-table";
    });
    }
    );

    </script>

    http://picasaweb.google.com/lh/photo/4KmKLPYDYIwzFS6BbNOfmg?authkey=Gv1sRgCJ2FjqX7hqreRw&feat=directlink

Popular Posts